Maya 7 PLE and UnrealEd Stream-lined
Content
Maybe it's too late to write tutorial about static mesh modeling for UT2004 when UT2007 is behind the doors (is it?) but whatever... Hopefully the work-flow will not change completely. I noticed that many mappers never start to use their own smeshes and I can understand that because it was a while til I got to the point where I can say that it's not that hard. :-) I'm no pro – of course, but I hope this will help. I will not focus on modeling – I'll focus on streamlined iterative smesh modeling with Maya and UEd connected via UDN's plugin. It might be not the best way – and I welcome any feedback (both how to enhance workflow and/or technical clarification). Anyway it took me some time to get here and I want to save it for you and – in the first place – encourage you towards your own custom smeshes!
What is discussed?
- how to create static mesh
- how to export it to UnrealEd
- how to update mesh and see in UnrealEd what happened (very crucial for iterative development like I like it ;-))
- how to assign materials
What is NOT discussed?
- no advanced UV mapping – because so far I sux with this ;-)
- no property textures mapping
What I'm gonna do right now is doorway with few homogeneous materials that will be somehow mapped on the surfaces. It's no real property modeling but you definitely need this if you want smesh here and there instead of BSP (making lot of cuts and so, you know :-)).
Prerequisites
The biggest problem is to grasp some modeling tool – in our case it will be Maya 7 PLE, because it's free. Get it here.
Ok, let's face it, you need to learn at least something. I'll touch some basic features I'm gonna use in this tutorial, but you'd rather look at 3D Buzz video tutorial – registration is needed but it's worth it. It covers older Maya version but it still applies. I recommend Issues 1 (Introduction) and 3 (Polygon modeling). Nice resource (tutorials and other stuff) for Maya is also SimplyMaya.com. I'll NOT cover basic movement – there are even short movies (Quicktime) delivered with Maya itself. Check them out because the movement is completely different (and it's funny to switch between Maya and UEd sometimes ;-)).
Before we start we have to download also UDN's plugin for Maya 7 PLE. Get it here and follow the instructions. You can check also Unreal Technology video tutorials – especially Issue 2 – Static Mesh creation. Few things doesn't apply already (material assignment for instance, we'll discuss it later in this tutorial) but again – it's few hours of easy watching. ;-)
Shape first
So now you started UnrealEd and Maya 7 PLE, right? Maya is switched to modeling menu set and you have the UnrealEdExport tab on the Shelf. I can't lead you to this point – make it work somehow. And now the action.
UnrealEd:
Look at this situation:
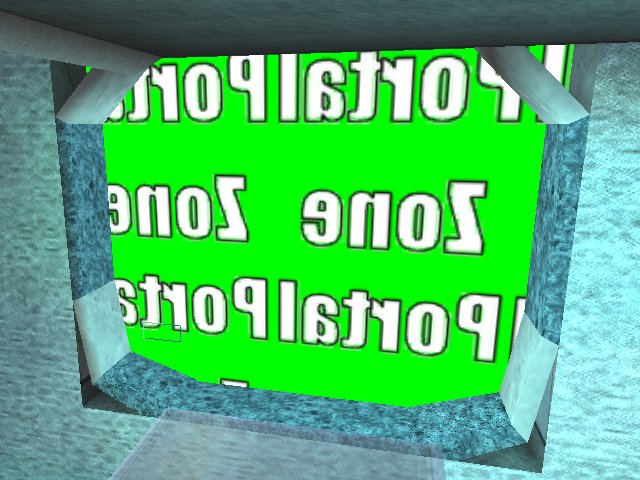
There is a tube leading from the wall and upper bridge meeting on the wall surface (both meshes modeled this way). Of course the subtraction brush in the wall is bigger than the tube and also the shape is not the same. We will "patch" the holes with some kind of doorway.
Maya:
It's up to you to choose shape you wanna start with. I'm no pro modeler as said before and modeling itself is not focus of this tutorial. I'll start with the plane and after I make a hole into it I'll shape it somehow. Easy enough. So this is the situation after creating plane, selecting its shape node (polyPlane1) and changing the axis so it's vertical and not horizontal.
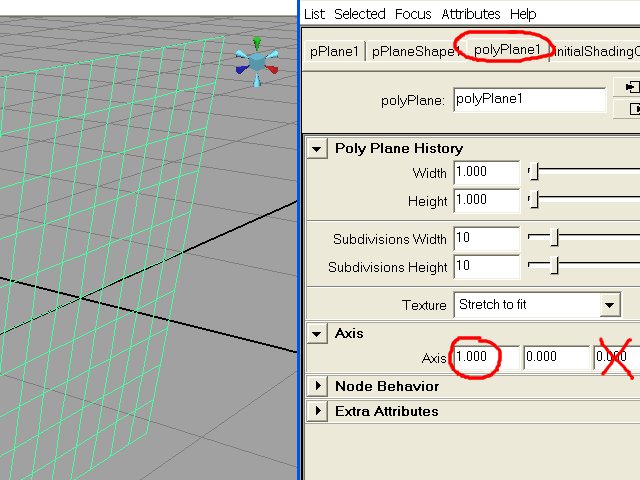
You can have channel box or something else on the right side (or nothing) but you can change this with three icons on the right side of the toolbar. The thing shown here is Attribute editor. Ok, I guess this was easy start. Continue on the same screen with changing width and height to ... let's say 16. And now is time to import it to UnrealEd for the first time.
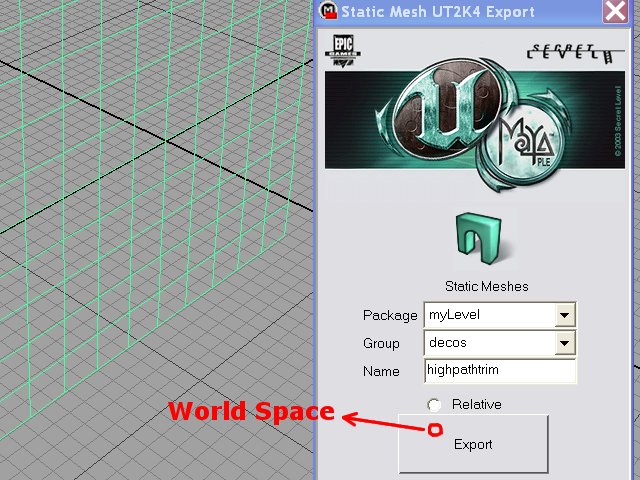
I use myLevel package (smesh embedded in the mapfile) and I created new group Decos in this case (or choose existing one). I chose World Space export (so far I didn't use the difference between this and Relative)... sorry that dialog is messed up on my computer. You can read something more about export also on BeyondUnreal Wiki.
And one note... don't close that dialog because you don't want to fill it up again. :-) Let it flow somewhere.
UnrealEd:
Back to our favourite editor! Go to smesh browser and select our victim. Place it and adjust it. I had to rotate it and even after I rotated it I couldn't see it. Ah... that's because surface normal is pointing out of me. I turned it 180 degrees and yes – I could see it. I started with scale (16,16,16) and that's it. You can of course create smeshes without scaling – or you can convert scaled smesh to nonscaled one – I just don't like big numbers in Maya. ;-) This really doesn't affect the workflow and you can adjust it according to your tastes. However – here is the result.
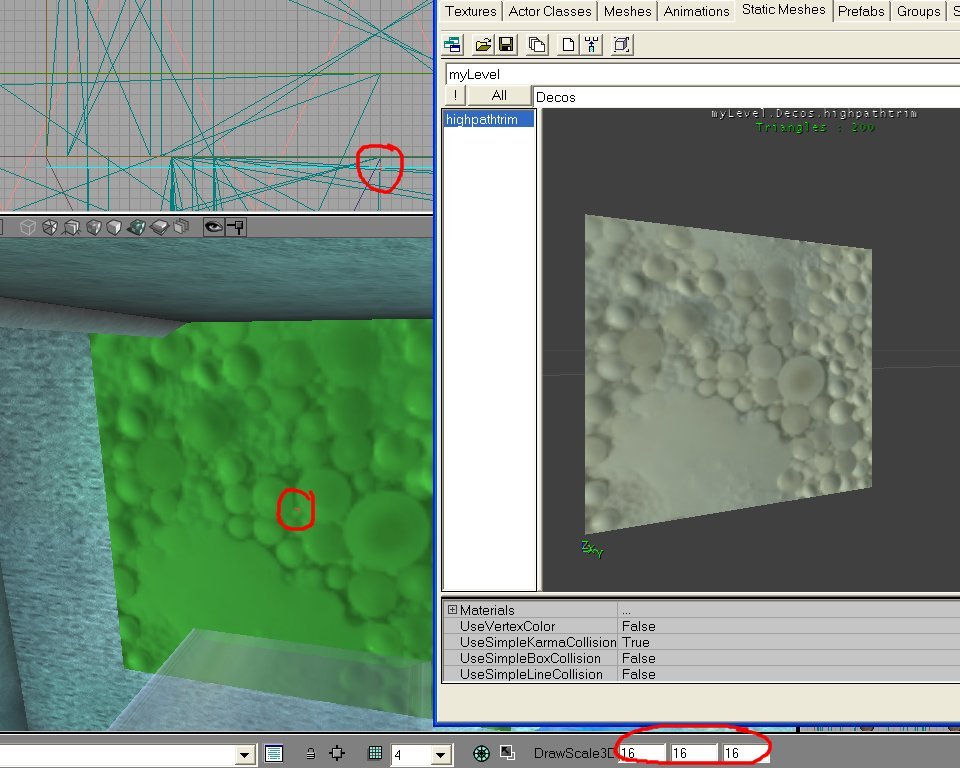
Pivots and DrawScale3D is marked but I guess you've found it even without that. ;-) Now is time to start iterate. We want to obtain some basic shape and than we'll start to care of materials.
Maya:
Click some axis in the viewport so you switch it to orthographic view so you can edit the plane with the help of the grid. Select the plane, show faces (F11), select 16 of them in the middle and delete them (Del). Press (5) (shading) and behold our lovely hole. Export (you need to select some face on the plane again to state what you wanna export, or press (F8) to switch to object mode) and check it in UEd. Yes, the change is there... Ok, now this tutorial has no surprising point – this is all the "magic" – have placed your smesh where you need it and check the result after Export. But we want to finish the doorway. So we're back in Maya. Maybe ring would be better shape than plane but we can handle.
Press (4) for faster Maya's response (wire model), choose Faces again (F11) and select 3x3 of them in the corner. Delete. Now switch to Vertex mode (F9) and select two points you want to merge. Check the image:
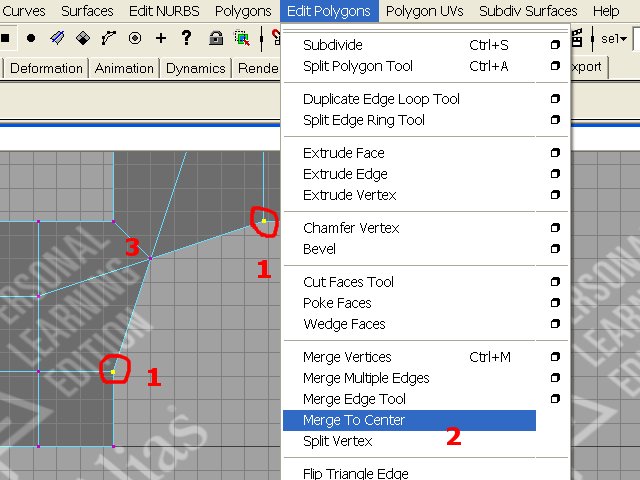
I already merged one pair of vertices. Select the other one (step 1), merge them to center (step 2, Edit Polygons->Merge To Center) and then you can check that also edges were merged – switch to Edge mode (F10) and marquee select the edge(s) near number 3 (step 3 :-)). If you have polycount displayed (Display->Heads Up Display->Poly Count) you can check there that only one edge is actually selected. That's good. Continue with all corners and get such a lovely ring:
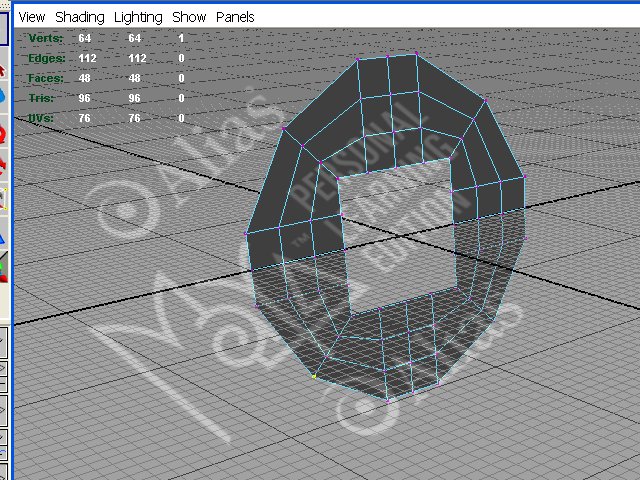
Now is the time to export it again and check. Ok, hole is small and nothing really fits. Lets vertex edit the shape again. I'm working in orthographic view of the perspective camera a lot with Snap to grids active. For example I choose inner-most ring of vertices in the face view and I select upper axis (top view) and move (W) them back a little. These are very basic things of course and forgive me if you know them already. However the result in perspective view is like this.
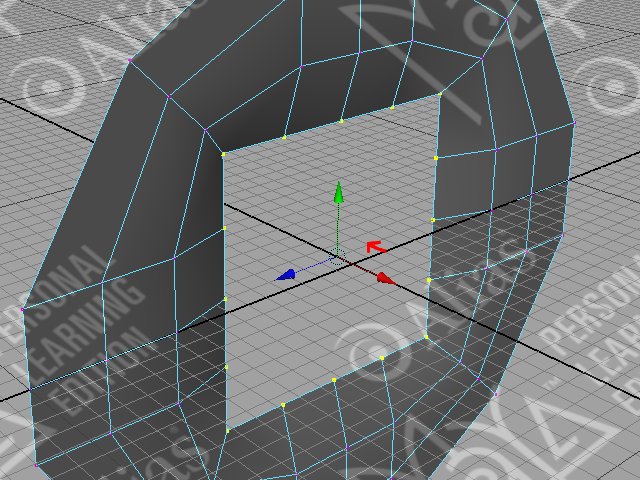
Small red arrow shows shift of the ring of inner vertices. Exactly the same way is used for shaping the doorway from top view (or side view, it depends) – this is what gives this smesh its depth. Of course I need to move vertices from front view to in order to match entrance hole and cover the BSP subtraction. To adjust inner points to the opening might be best way to start. Now I'll skip this part because it's still just F9, W, mouse moving and you'll find it out by yourself. In my case current ring has more segments than I need. I need three from the center to the border because of making it plastic and not flat, but 16 segments around the perimeter is too much for my need. In this case I can merge some of the segments like this:
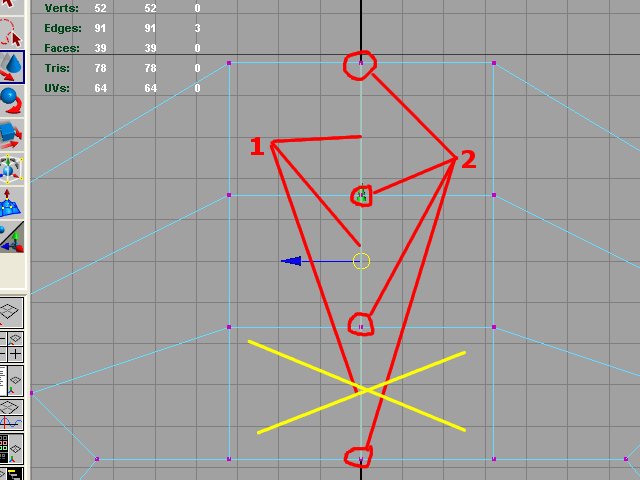
Here I selected three edges (F10) and deleted them(step 1). Now there are unnecessary vertices so I selected them (F9) and removed them too (step 2). Yellow cross marks new one face instead of previous two. Well... after a bunch of vertex edits we perform just another export and in UEd I suddenly see this:
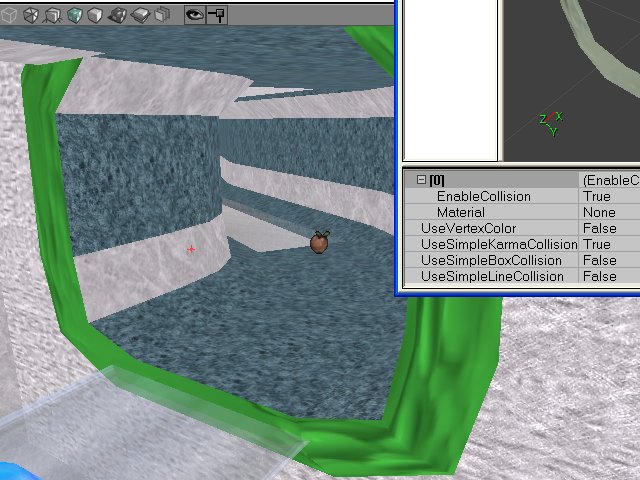
Everything might be different with other shape in the start but I wanted to show you also really simple basic moving-around that might be helpful. Shape is done in my eyes and now it's time to UV map materials.
Materials
I promised easy UV mapping. Now I hardly can do more than this. ;-) Before I jump directly to the solution I'll show you how you can assign materials in UEd and how you can create smesh with more materials. I bet you know that you can change skins in Properties->Display->Skins. Number of skins should match the count of different materials on the smesh – the other skins are simply ignored. This is setting for one particular smesh. If you want to set material for all instances of this smesh, do it in smesh browser. There is Material array where you can assign textures as you wish. Some smeshes have material already assigned, some don't. Skins always override this general assignment – of course.
If you export simple smesh from Maya it has all surfaces with one material. You can try to assign texture (either Skins in properties or Materials in smesh browser) – it will look ugly if you edited vertices a lot. :-) Now you can assign Materials in UEd – there is no problem in that. Problem is that every time UEd imports the smesh it removes those assignments (skins stays thou, but skins are not good mechanism for default material assignment). That sux. And this is why you want to assign material in Maya before actual export from it. Forget about the 3D Buzz videos because in Maya 7 PLE the system is different than the one described there. (And now I wanna thank Saka that made my life easier with this – thanks for help! :-))
Maya:
You definitely should check 3D Buzz videos to learn more about Hypershade window because we're about to work with it. Open it.
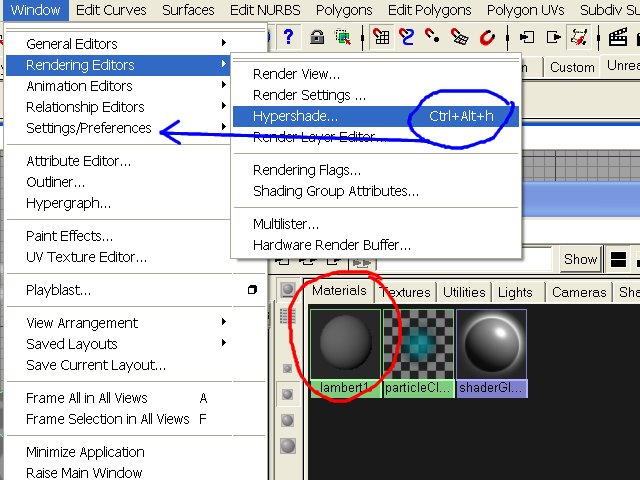
You can notice short-cut – and I guess you don't have it. If you want assign shortcuts, do it in Window->Settings/Preferences->Hotkeys... I strongly recommend to do so. Not only because of this window. I have hotkeys at least for few most used actions – especially from Edit Polygons menu (Delete Vertex, Split Polygon, etc). Now you can see Hypershade window opened under the menu already on my shot. There is one material – lambert1 – that is assigned to faces by default. If you want to assign material for UEd you have to create new material first.
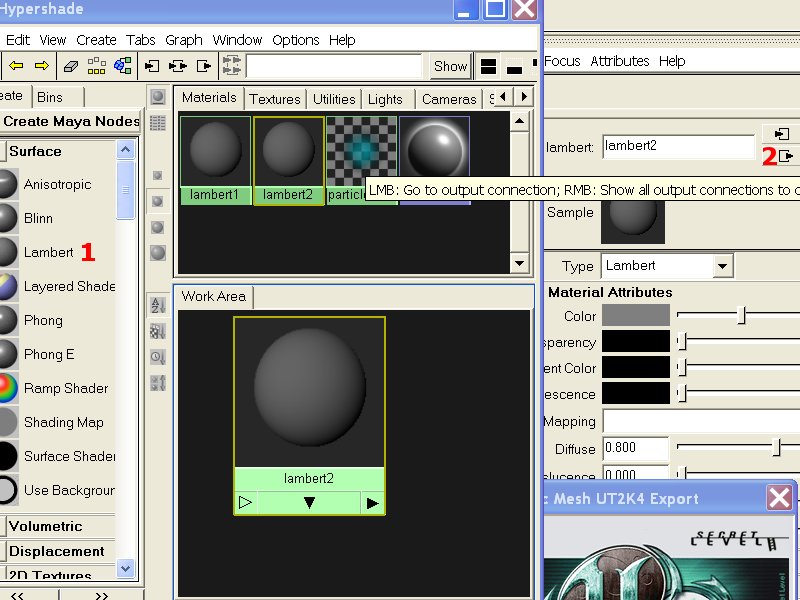
Click on Lambert (step 1) in Create tab on the left. Material is selected and appears in Attribute Editor. There you click on the output connection button (step 2). Now you see attributes of shading group of this particular material. First input box (shadingEngine) is the name of this group – and you can change it. Here I used "base6blue" and this relates to texture "myLevel.Base.base6blue". Now – don't ask my why the name without package and group suffice – and it works also for materials from different packages (e.g. OceanGlass from AWGlobal works just fine). It simply works. (Yeah, now I can hear Hourences with his "avoid name duplication" again. :-)) Anyway... back to work. Put the name of the texture/material there – something you have in your level. Now in object mode (F8) select your model and in Hypershade press right mouse button on the lambert2 material (BTW: rename that material to something meaningful too) – hold and choose Assign Material To Selection. Now export the model again. You should see the smesh in UEd with material assigned already and you're free from assigning it again and again after every export when you want to see it with materials.
You have to use new material in Maya because default one (lambert1) can't be renamed (this applies also for its shading group).
If you want more materials on the smesh simply create new materials, name theirs shading groups properly (rename the materials too although it's just cosmetics) and after selecting desired faces assign this material to them. I use material names like "base", "trim" or "glass" that simply describe particular surfaces. Now you know nearly everything necessary and we just need to UV map the model properly. You can just choose Polygon UVs->Automatic Mapping and somehow mess with it for simple models, but you'll definitely want to import textures into the Maya in order to see the changes just in time.
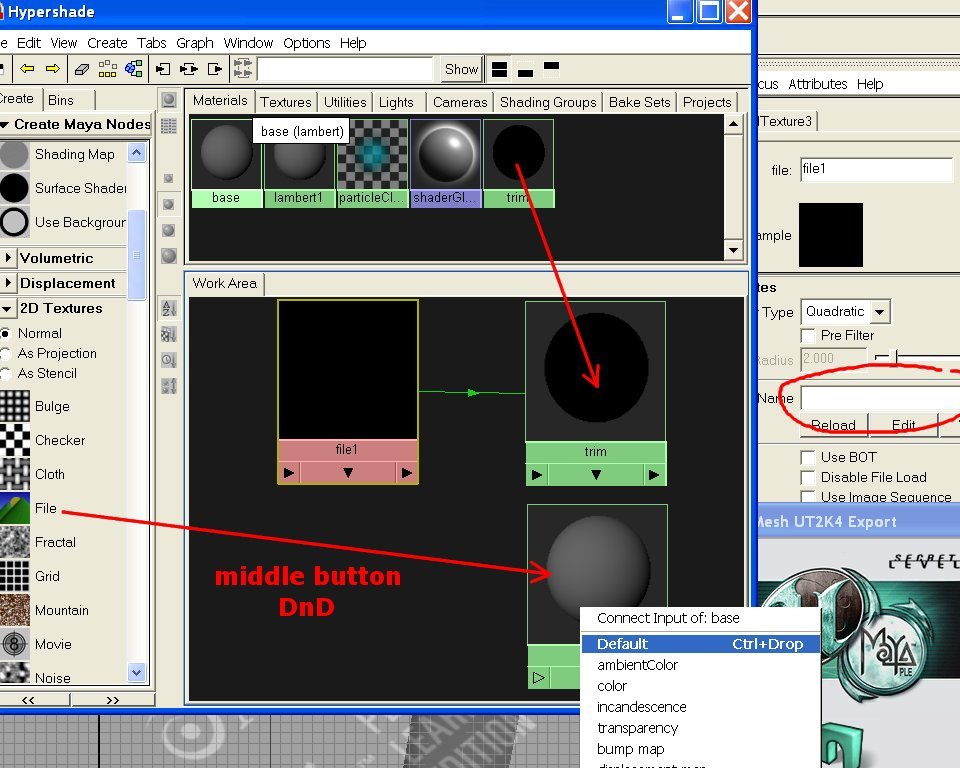
In the Hypershade you can move material to the Work Area with drag&drop with the middle mouse button. I have "trim" and "base" material there. Then find File in the left list, middle mouse DnD it on top of the material and select Default (or hold Ctrl during DnD and you don't need to select it). Move the File node to the side and you can see that this node feeds the material node. Select your texture in the Attribute Editor (I have Targa files of them). Now go to viewport and press (6) to see the textures applied.
Select your object and in the menu choose Polygon UVs->Automatic Mapping. Now just press the mouse button in the viewport next to the object. You can see the projection node among the Attribute Editor tabs (maybe polyAutoProj1?) so select it.
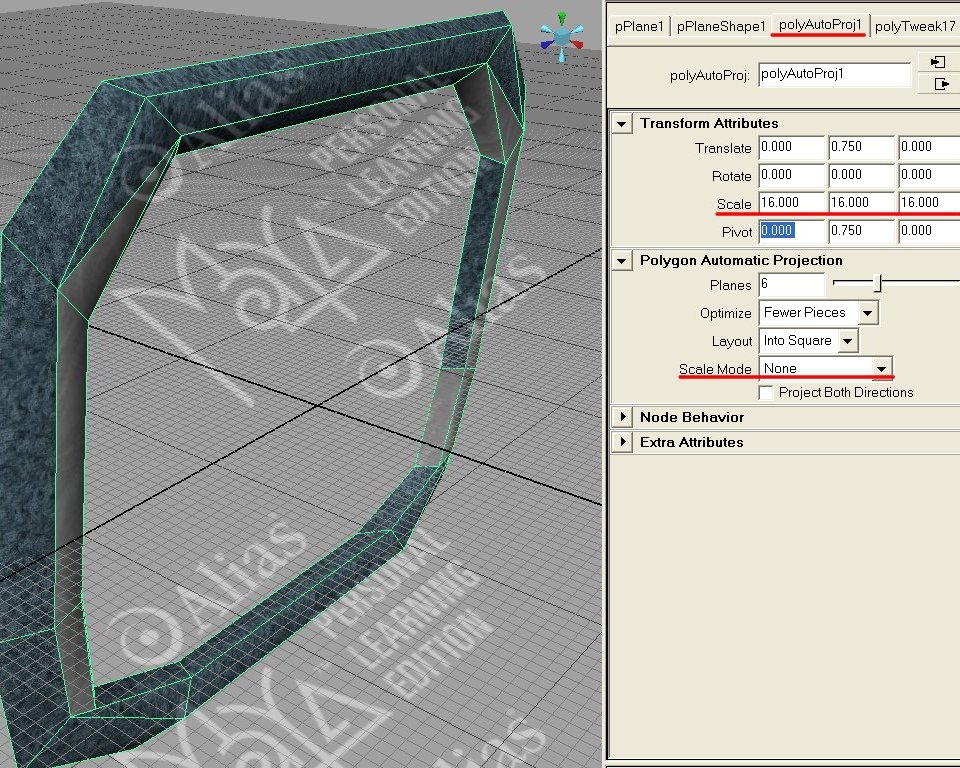
Now this is good option if you want map your UVs to some square that you use later for UV map texture. I don't want this. I used homogeneous textures because detailed property texturing is not my goal. I just select Scale Mode: None and I choose some texture scale (16, 16, 16 for instance). You can experiment here because you see the result immediately in the viewport. If the Scale Mode is not None the scale works somehow different. You really should study this mapping elsewhere if you want to know more. This is easy to go tutorial. With homogeneous textures this looks just good and hopefully no seams are visible. If you vertex edit the model a lot after mapping you have to repeat it. You can remove the old one in that case – there are many ways how to do it (Hypergraph (do not mess it with Hypershade! ;-)), delete history, remove UVs, ...) but I leave this to you. The result is here and it would took me much less then it did while I wrote this tutorial. :-)
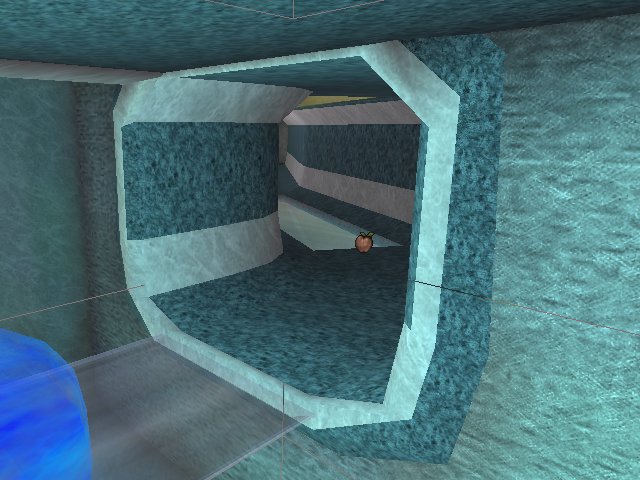
I used one more feature for my model: Edit Polygons->Normals->Average Normals. This causes the shading to be softer. This might not be always what you want in case of let's say cube. But here it fits.
Conclusion
Hope this helps you because it's really easy after few times and you can do a lot with this. If you have any questions or something to add, tell me. I'll gladly update or correct the article.
To see what you get – and to see it quickly – is very important thing. You can achieve it in Maya when we're talking about UV mapping and texturing. When you want to shape your object to fit some brush, you have to import it to the UnrealEd and place it where you want. Now it looks easy to me but it took me some time to find out those ideas – have smesh placed where you want it, don't close Export window, have materials assigned in order to see them in UEd after every import... now it looks easy, huh? Then why does anyone still hasitate? :-)))